
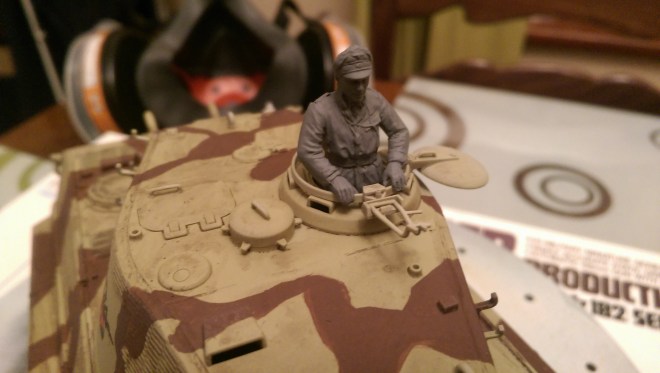
The next thing to do on my tiger 2 was to add the decals and tank commander. I applied the decals to a layer of varnish and then varnished Continue reading Tamiya 1:35 King Tiger Radio Control Part 3
The next thing to do on my tiger 2 was to add the decals and tank commander. I applied the decals to a layer of varnish and then varnished Continue reading Tamiya 1:35 King Tiger Radio Control Part 3

Next on my todo list is finishing off the r/c Tiger 2 that I started last year.

The upper hull turret and barrel is air brushed dunkel gelb.

After the main coat was applied I hand painted on a red brown camouflage pattern.
Last night I finished off the falcon model. I hand painted the canopy and am happy with how it turn out. There were decals provided but Continue reading Revell 1:241 Millennium Falcon Part 2
This is my first attempt at a sci fi model kit and with only 20 parts it seemed like a nice little kit to build. I brought this last year when I started getting excited Continue reading Revell 1:241 Millennium Falcon
When I start getting back into my models I always end up buying more kits even if my pile is not getting any smaller.
I was pleasantly surprised to find a Fury kit as I was not aware that one existed. I know people have been doing custom Fury builds but
Continue reading M4A3E8 Sherman “Easy Eight” “Fury”
I intended go get some modelling done over the Christmas break but that did not happen. So over the last week I decided to finish of my Italeri World of Tanks Type 59 1:35 kit.
I picked this kit up at Tankfest
Continue reading Chinese Type 59 Tank
As with my 3D Printer build there has been a delay on getting the parts to continue.
With the SkyRider I have received part 9 before part 8. This is not an issue though as Continue reading Skyrider Drone Pack 9
Its been a while due to some shipment delays but here are the next two 3D Printer packs.

In this stage we add some acrylic cogs to the slider rods facing the front of the printer.
Continue reading 3D Printer Part 5 & 6

Over the weekend I decided to focus on the lower hull of this kit. That way I could start playing about with the electronics and get the thing moving.

The first thing to do was to start masking areas that should not be painted. These are areas where the wheels will be attached Continue reading Tamiya 1:35 King Tiger Radio Electronics and Lower Hull
When building my first metal earth model I soon realised the hard part of these models is when you need to create circular shapes. This put me off of tackling the rest of my t34 model for a while.
I decided to get on a finish this model so it was time to tackle the road wheels on this kit.

The road wheels consist of a metal sheet rolled into a tube with a circular cap attached to the front of them. A final metal piece goes on top to hold it all together. These were very fiddly and some took several attempts to put together.

Although smaller the gears at each end of the tank were easier to attach as these were only made of two pieces.

The tracks went on pretty easy as these were just wrapped around the wheels and held onto the back plate that the wheels are attached to. The complete set of wheels with tracks were then attached to each side of the hull.
One thing I could of got better was the road wheels. They do not sit on the track properly because of the metal tabs sticking out of the bottom of them.

Given that this kit only cost around £6 I am very impressed with the outcome and detail. These are a nice alternative to plastic models as they require a different skill set and can be built pretty quickly.

Next up I am building the himeji castle for my girlfriend.


