
Being a bit bored of making military vehicles and a big fan of space exploration I picked up a couple of kits for the Apollo 11 50th Anniversary. This is the Revell Apollo Astronaut, I thought it would be an interesting kit as it will be the first time I have built a kit focused on a figure that size.
Category: Uncategorized

Bubblegram / Laser Crystal LED Stand
When I visited the European Space Center earlier this year I picked this cool bubblegram of the planets in our solar system. I decided to make a base for it so I could light it up with some LED’s.

I decided to get with RGB LED’s so that I could have the colour change over time. Making a circuit for one of these was easy enough. I used 3 x 220 ohm resistors for each of the three anodes on each LED.
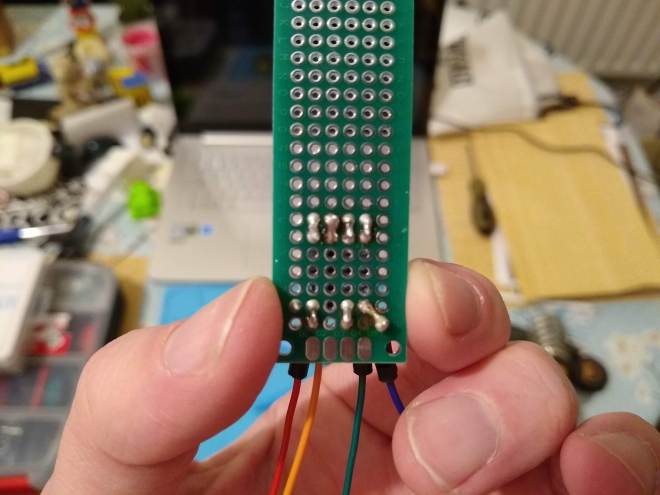
I soldered the resistors to the LED and added cables for the anodes and cathode.

An Uno board was used to test the LED. pins 9-11 (PWM pins) were used to control the colours and brightness. By altering the PWM width for each colour the brightness of each colour and thus colour mixing can be controlled.

Next I set about designing the 3D model of my stand. I created a block the size of the bubblegrams I have and added a rim round the outside to hold it in place. I hollowed out the middle to make room for the electronics and cut a hold in the side for the power plug.
The stand is available on Thingiverse https://www.thingiverse.com/thing:3633780

There is no way an Uno board would fit in the stand so I picked up a Nano to use instead.
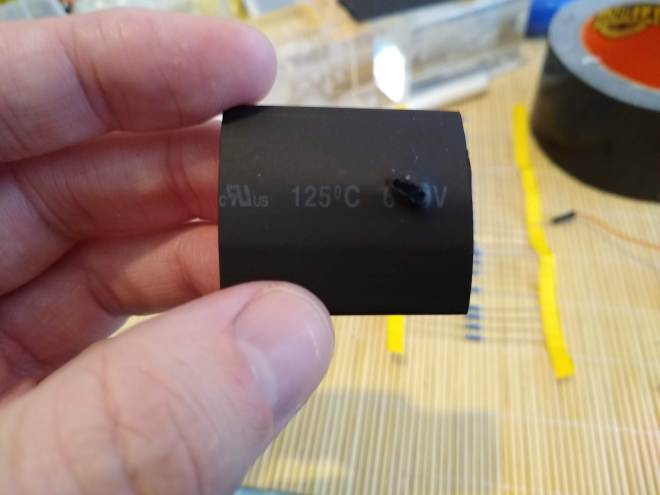
Before squeezing the electronics into the case I decided to wrap the RGB boards I had made in shrink wrap to prevent them shorting out if press against the other boards. A hole was cut for the LED to poke through.
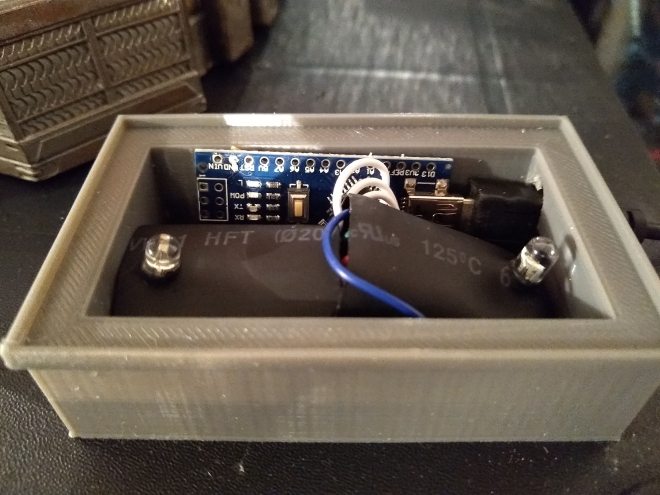
The electronics were crammed into the stand. They literally just fit!


The LEDS were programmed to cycle through different colours in a loop.
The scripts I have written to do this to are available on my GitHub page. https://github.com/shane-powell/led-lighting

Open RC F1 Improvements
Front Axles
As seen in my last post there were a few issues with my open RC build that needed resolving. The first was the front wheel axle snapping. I have since printed a whole collection of front axles with 100 % infill (solid). This makes them much stronger than when they were only 20%. As I printed a whole bunch I have spares at the ready if I need them.
Steering
The next thing to look at was the steering. Here I was having issues with the servo not centering the wheels with no input. This indicated there were binding issues but it seems the servo may have also been at fault. While playing with the trim settings on the transmitter the servo went crazy and melted itself. There was a lot of smoke coming out so I quickly ripped out the Lipo battery and took the car outside. The house stunk of burnt electronics.

The offending item was removed and remarkably caused no warping to the PLA chassis.

I fitted a new servo and adjusted how the servo linkage worked to make the wire straighter.

I also used a multitool to sand down the inside of the car body so that the servo rod no longer snagged on it. Lastly I added a washer between the servo saver and lower chassis.
These things combined have fixed the steering issues I was having. The steering now centers itself and responds a lot better than before.
Tyres
I have been having a lot of fun printing TPU tyres at different settings and have made some progress with regards to producing tyres with more grip.

That said the TPU tyres always lacked the grip of a rubber tyre so I caved in and brought some Tamiya tyres. I will go back to TPU when making a heavy vehicle as part of the problem is that the f1 car is so light the tyres are not creating much friction with the ground.

The Tamiya tyres. I had no idea that these came in different compounds so I ended up with super soft rear tyres and standard front ones.

New rims had to be printed for the Tamiya tyres and the wheel ends up a bit bigger than the printed tyre version. You can see that the rear tyre almost touches the bargeboard. This is good as it increases ground clearance a little which should lead to less damage when driving over uneven terrain.
I have only tested the Tamiya tyres indoors at the moment on wooden floor but I can already tell they perform miles better than the TPU tyres. I did make a second video however of my second generation TPU tyres at the weekend. These were a step up from my previous attempt which were much too hard. These are printed at 10%. I still have not had much success with printing them at 5% at all.
Next time with the rubber tyres the lack of grip should be a thing of the past!
Gemini 4 blade propeller
I recently received a 4 blade propeller in the post to try out on my Gemini craft. Going from my experiences with my smaller craft it should be quieter and more powerful. Well it certainly seems more powerful but its a lot louder! There’s also another issue where its drawing so many amps that the ESC seems to be getting too hot and cutting out. I am not surprised really and even the wires themselves are getting hot! I think I will switch back to the 2 blade for now.

Palaform X500 Hovercraft
Now I have a more space to work I decided to build a hovercraft kit I have had lying around for a few months.
This is the X500 kit made by Palaform and electronics aside it is a cheap kit thanks it it being made out of correx.

The hull arrives in pre cut sheets and theses are folder / glued together in order to build the structure.
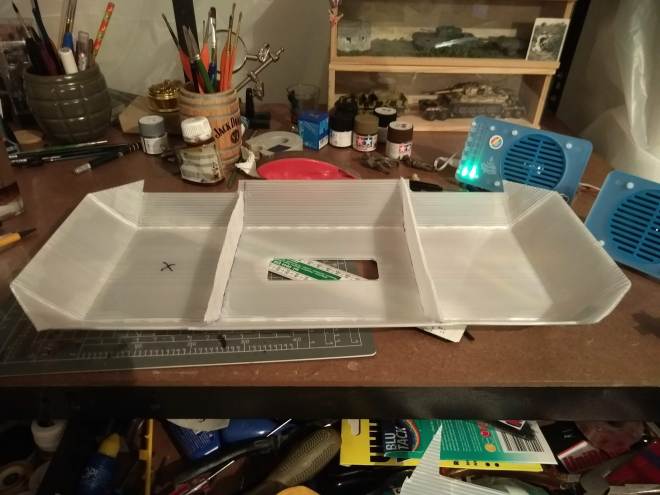
Putting the hull together requires a glue gun, Continue reading Palaform X500 Hovercraft

Mini 4WD Lunch Box
The lunch box is probably the most famous Tamiya RC of all and I have yet to build one. I did however stumble across a Mini 4WD version of the lunch box which would make a nice scaled down model to have on a desk. Mini 4WD is something that never seemed to make it to the UK, probably because of Scalextric’s dominance of the slot car market. I only know of their existence thanks to someone bringing me one back from a visit to Japan as a present.
Mini 4WD is similar to Scaletric but you have no control over the car once the race has started. This means everything is more down to the build and design of the car rather than adjusting the speed as it goes round.
Anyhow I now have a few mini 4WD cars. They make a nice break from larger projects as they easy snap together kits that can be made up in an evening. They also make for good shelf models of full size Tamiya RC kits.

They are also good fun to run although its better if you have a track for them to follow. This one in particular has a wheelie bar and some Continue reading Mini 4WD Lunch Box

3D Printer
I have been so busy playing with my 3D printer that I have neglected posting about it. I find it to be a deceptively simple machine with much configuration required to get things going smoothly.
I have got to the stage now where I can look at a 3d model and make the required tweaks to suite the printing of that particular model. This helps to avoid wasting time and filament on prints that are doomed to fail and is particularly important when you consider printing can take many hours.
Here is one of my favourite prints so far. Bender from Futurama painted using Tamiya paints. I downloaded model for this print from thingiverse details are underneath the images


Bender Bust by cerberus333
Published on November 13, 2013

Tamiya 1:35 King Tiger Radio Electronics and Lower Hull

Over the weekend I decided to focus on the lower hull of this kit. That way I could start playing about with the electronics and get the thing moving.

The first thing to do was to start masking areas that should not be painted. These are areas where the wheels will be attached Continue reading Tamiya 1:35 King Tiger Radio Electronics and Lower Hull

Tamiya 1:35 King Tiger Radio Control
The problem I find with R/C vehicles is they take up a lot of space considering how often I use them. I stumbled across (and won) one of these great kits on eBay the other day. I did not even know these kits existed!
They are Tamiya 1:35 static kits modified to take R/C components giving you a highly detailed R/C model. This one is from 2001 and they seem pretty rare. There are some pre-built 1:35 models around abroad but these seem to have some ugly ir sensor on top of them.

This is what you get in the R/C box alongside the kit. There are motors and gears for the drive and turret rotation along with some extra parts to convert the static model to R/C.

This is the model kit itself. I looks like it comes with stronger tracks that you would get with the static model.

I purchased some after market options for my build. The first is a zimmerit sheet. This give the surfaces a texture representing the paste that was put on some armour to prevent magnetic mines from sticking to the hull.

The second upgrade I went for was the photo etched grills. I did no realise at first but you also get a sight for the turret gun as well.

I started the kit by glueing the photo etched parts into place.

Next I started adding the zimmerit. I had to cut out areas on the sheet with a modelling knife where any parts would stick out from. First up was the rear hull.

Next I added zimmerit to the front lower hull.

Finally I added the zimmerit sheets to the turret sides. On each side a large square is cut out for the unit markings to sit in.
That’s all for now, more on this build soon!
Team C Jekyll Kit 13×3 Motor 8.4v Battery Ball-Raced
Testing my team C Jekyll buggy. I am impressed with the performance but it is overheating my esc so I need to sort that out.
13×3 Orion Motor.
Mtroniks 10t limit sniper esc
8.4v 5100 Orion Rocket Pack Nimh
Spektrum DSM radio.
