Back when I received my x500 kit from Palaform it arrived with a lift duct to play with. I decided not to use it at the time as I just wanted to build the kit as standard but I decided it was time to experiment with it.
As seen in my last post there were a few issues with my open RC build that needed resolving. The first was the front wheel axle snapping. I have since printed a whole collection of front axles with 100 % infill (solid). This makes them much stronger than when they were only 20%. As I printed a whole bunch I have spares at the ready if I need them.
Steering
The next thing to look at was the steering. Here I was having issues with the servo not centering the wheels with no input. This indicated there were binding issues but it seems the servo may have also been at fault. While playing with the trim settings on the transmitter the servo went crazy and melted itself. There was a lot of smoke coming out so I quickly ripped out the Lipo battery and took the car outside. The house stunk of burnt electronics.
The offending item was removed and remarkably caused no warping to the PLA chassis.
I fitted a new servo and adjusted how the servo linkage worked to make the wire straighter.
I also used a multitool to sand down the inside of the car body so that the servo rod no longer snagged on it. Lastly I added a washer between the servo saver and lower chassis.
These things combined have fixed the steering issues I was having. The steering now centers itself and responds a lot better than before.
Tyres
I have been having a lot of fun printing TPU tyres at different settings and have made some progress with regards to producing tyres with more grip.
That said the TPU tyres always lacked the grip of a rubber tyre so I caved in and brought some Tamiya tyres. I will go back to TPU when making a heavy vehicle as part of the problem is that the f1 car is so light the tyres are not creating much friction with the ground.
The Tamiya tyres. I had no idea that these came in different compounds so I ended up with super soft rear tyres and standard front ones.
New rims had to be printed for the Tamiya tyres and the wheel ends up a bit bigger than the printed tyre version. You can see that the rear tyre almost touches the bargeboard. This is good as it increases ground clearance a little which should lead to less damage when driving over uneven terrain.
I have only tested the Tamiya tyres indoors at the moment on wooden floor but I can already tell they perform miles better than the TPU tyres. I did make a second video however of my second generation TPU tyres at the weekend. These were a step up from my previous attempt which were much too hard. These are printed at 10%. I still have not had much success with printing them at 5% at all.
Next time with the rubber tyres the lack of grip should be a thing of the past!
I recently built a new 3D printer having wanted a bigger build bed and to go back to open printing. I went for the Ender 3 Pro which has turned out to be a great machine for the price.
I have always wanted to print and build an Open RC car but did not have a big enough print bed to print the parts. Now I do however so I thought it would make a good test for my new printer. All of this model apart from the Tyres will be printed in PLA. The Tyres will be printed in TPU so that they are flexible.
The first thing I did was to try printing the chassis. I printed this with a bit more infill than the rest of the parts to make it stronger. The chassis parts and the rear axle holders were printed at 35% infill. Continue reading Open RC F1 Car Part 1
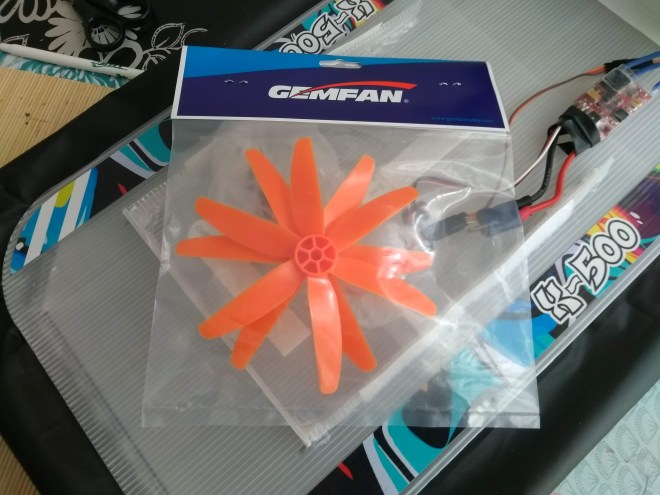
I recently received a 4 blade propeller in the post to try out on my Gemini craft. Going from my experiences with my smaller craft it should be quieter and more powerful. Well it certainly seems more powerful but its a lot louder! There’s also another issue where its drawing so many amps that the ESC seems to be getting too hot and cutting out. I am not surprised really and even the wires themselves are getting hot! I think I will switch back to the 2 blade for now.
After a major downpour on Friday I stumbled across a flooded car park which I thought would be perfect for testing my e-Gemini on water. The craft performs remarkably well, hovering gracefully and turning on six pence. As you can see I am still getting used to the handling. 🙂
Here is my first go at piloting the craft. It feels a bit nicer to control compared to the smaller craft because of its extra weight and size. I have not used it enough yet to know whether or not I need to adjust the center of gravity. It may look a little twitchy in the video but I was trying to keep it in a small area away from any cars so did not give it a proper straight line test.
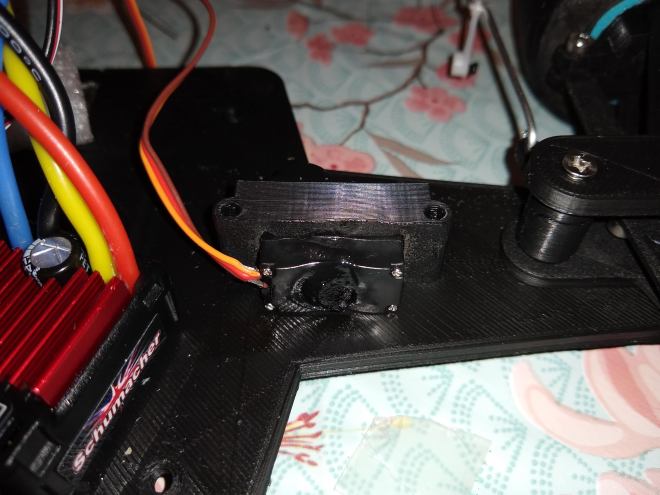
Something I forgot show in my previous post is the electronics under the hovercraft seat.
Here we have a 5000mah 3 cell Lipo so plenty of speed and runtime. This connects to a brushless motor ESC which connects to the brushless motor and receiver. The receiver is an ar600 aircraft receiver. Aside from sending control inputs to the ESC it is also connected to a servo at the rear of the craft to control the rudders. A servo extension cable was required because of the distance and the fact the cable had to be run around the duct in order to make sure it was safely away from the propeller.
Funnily enough the e-Gemini was the first hovercraft kit that I brought way back in 2013. Unfortunately because of the space required to build it and the fact it looked a little overwhelming back then I have put it off till now.
I finally plucked up the courage to take one of my hovercraft out on a lake. The thought of sending something out with all those costly electronics is bad enough but when its a model you have built the thought of losing it is even worse.
After having success with the X500 build I decided to look back at my fusion 400 which was not running so well. As you can see from the video below it is leaning to one side and not fully inflating Continue reading Bringing the fusion 400 into line