Poseable 3D Models & First Blender Creations Printed

I decided to have a go at making a basic 3D humanoid in blender. After a little research I gave it ago and I am rather pleased with my initial results.

manCreate

Here I am using a mirror modifier Continue reading Poseable 3D Models & First Blender Creations Printed

A Quick Clip Of Animated Tank Tracks In Blender

Again this is a very basic model and I am already playing around with better ways of doing this using physics and motors.

The animation was made by moving the y coordinates of the duplicated track piece forwards or backwards by the width of the track piece.

The video demonstrates one track going forward and the other going backwards.

Got A Nice Photo Of The Star Of Fury At Tank Fest

Sorry if you were expecting Brad Pitt…

After a year off of Tank Fest I decided to go again this year. My main goals this year were to see the Fury tank, visit the conservation centre and check out Continue reading Got A Nice Photo Of The Star Of Fury At Tank Fest

3D Modelling Making Tracks

I decided to attempt to add some tracks to my tank model I am working on in blender. From what I have read making good tank tracks is a kind of rights of passage in 3D Modelling. The detail some people have gone into is Continue reading 3D Modelling Making Tracks

3D Modelling

I recently been playing around more and more with 3D modelling.

There are two reasons for this.

Firstly as you may have seen from my previous posts I am building a 3D printer. Secondly I have been prototyping different computer game ideas in Unity for a while now and decided to switch to 3D for some of my ideas.

Here is a couple of images of a tank model I am working on. It does not really have a dedicated purpose yet but I thought if I made any models for use in games they could be simplified for printing purposes.

tankEditor

The weapon of choice for my 3D modelling is Blender. This is because it is a free open source application with plenty of tutorials on itself and integration with Unity.

tankblend.blend

It looks like 3D printing will pose its own challenges where things like over hanging parts will be a challenge. This does give me the idea of printing a model over several runs in kit form though which would be cool.

Italeri World of Tanks Ferdinand

ferdprimer1Work has started on the World of Tanks Ferdinand kit.

I started by working on the main chassis and getting the hull together. The suspension took a little while to make as it is each of the 6 parts are comprised of several small parts. After adding these I filed and built the gun.

I gave the gun a coat of dunkelgelb to ensure that the whole of the ball of the gun is painted in the base coat. This will prevent unpainted spots appearing when the gun is moved.

Before fitting the gun into the turret I primed the hull so that I didn’t need to mask the gun up.

ferdprimer2I intend to paint a camouflages scheme on the tank destroyer using dunkelgelb as the base coat with green and brown areas.

World of Tanks Ferdinand Kit

ferdbox2

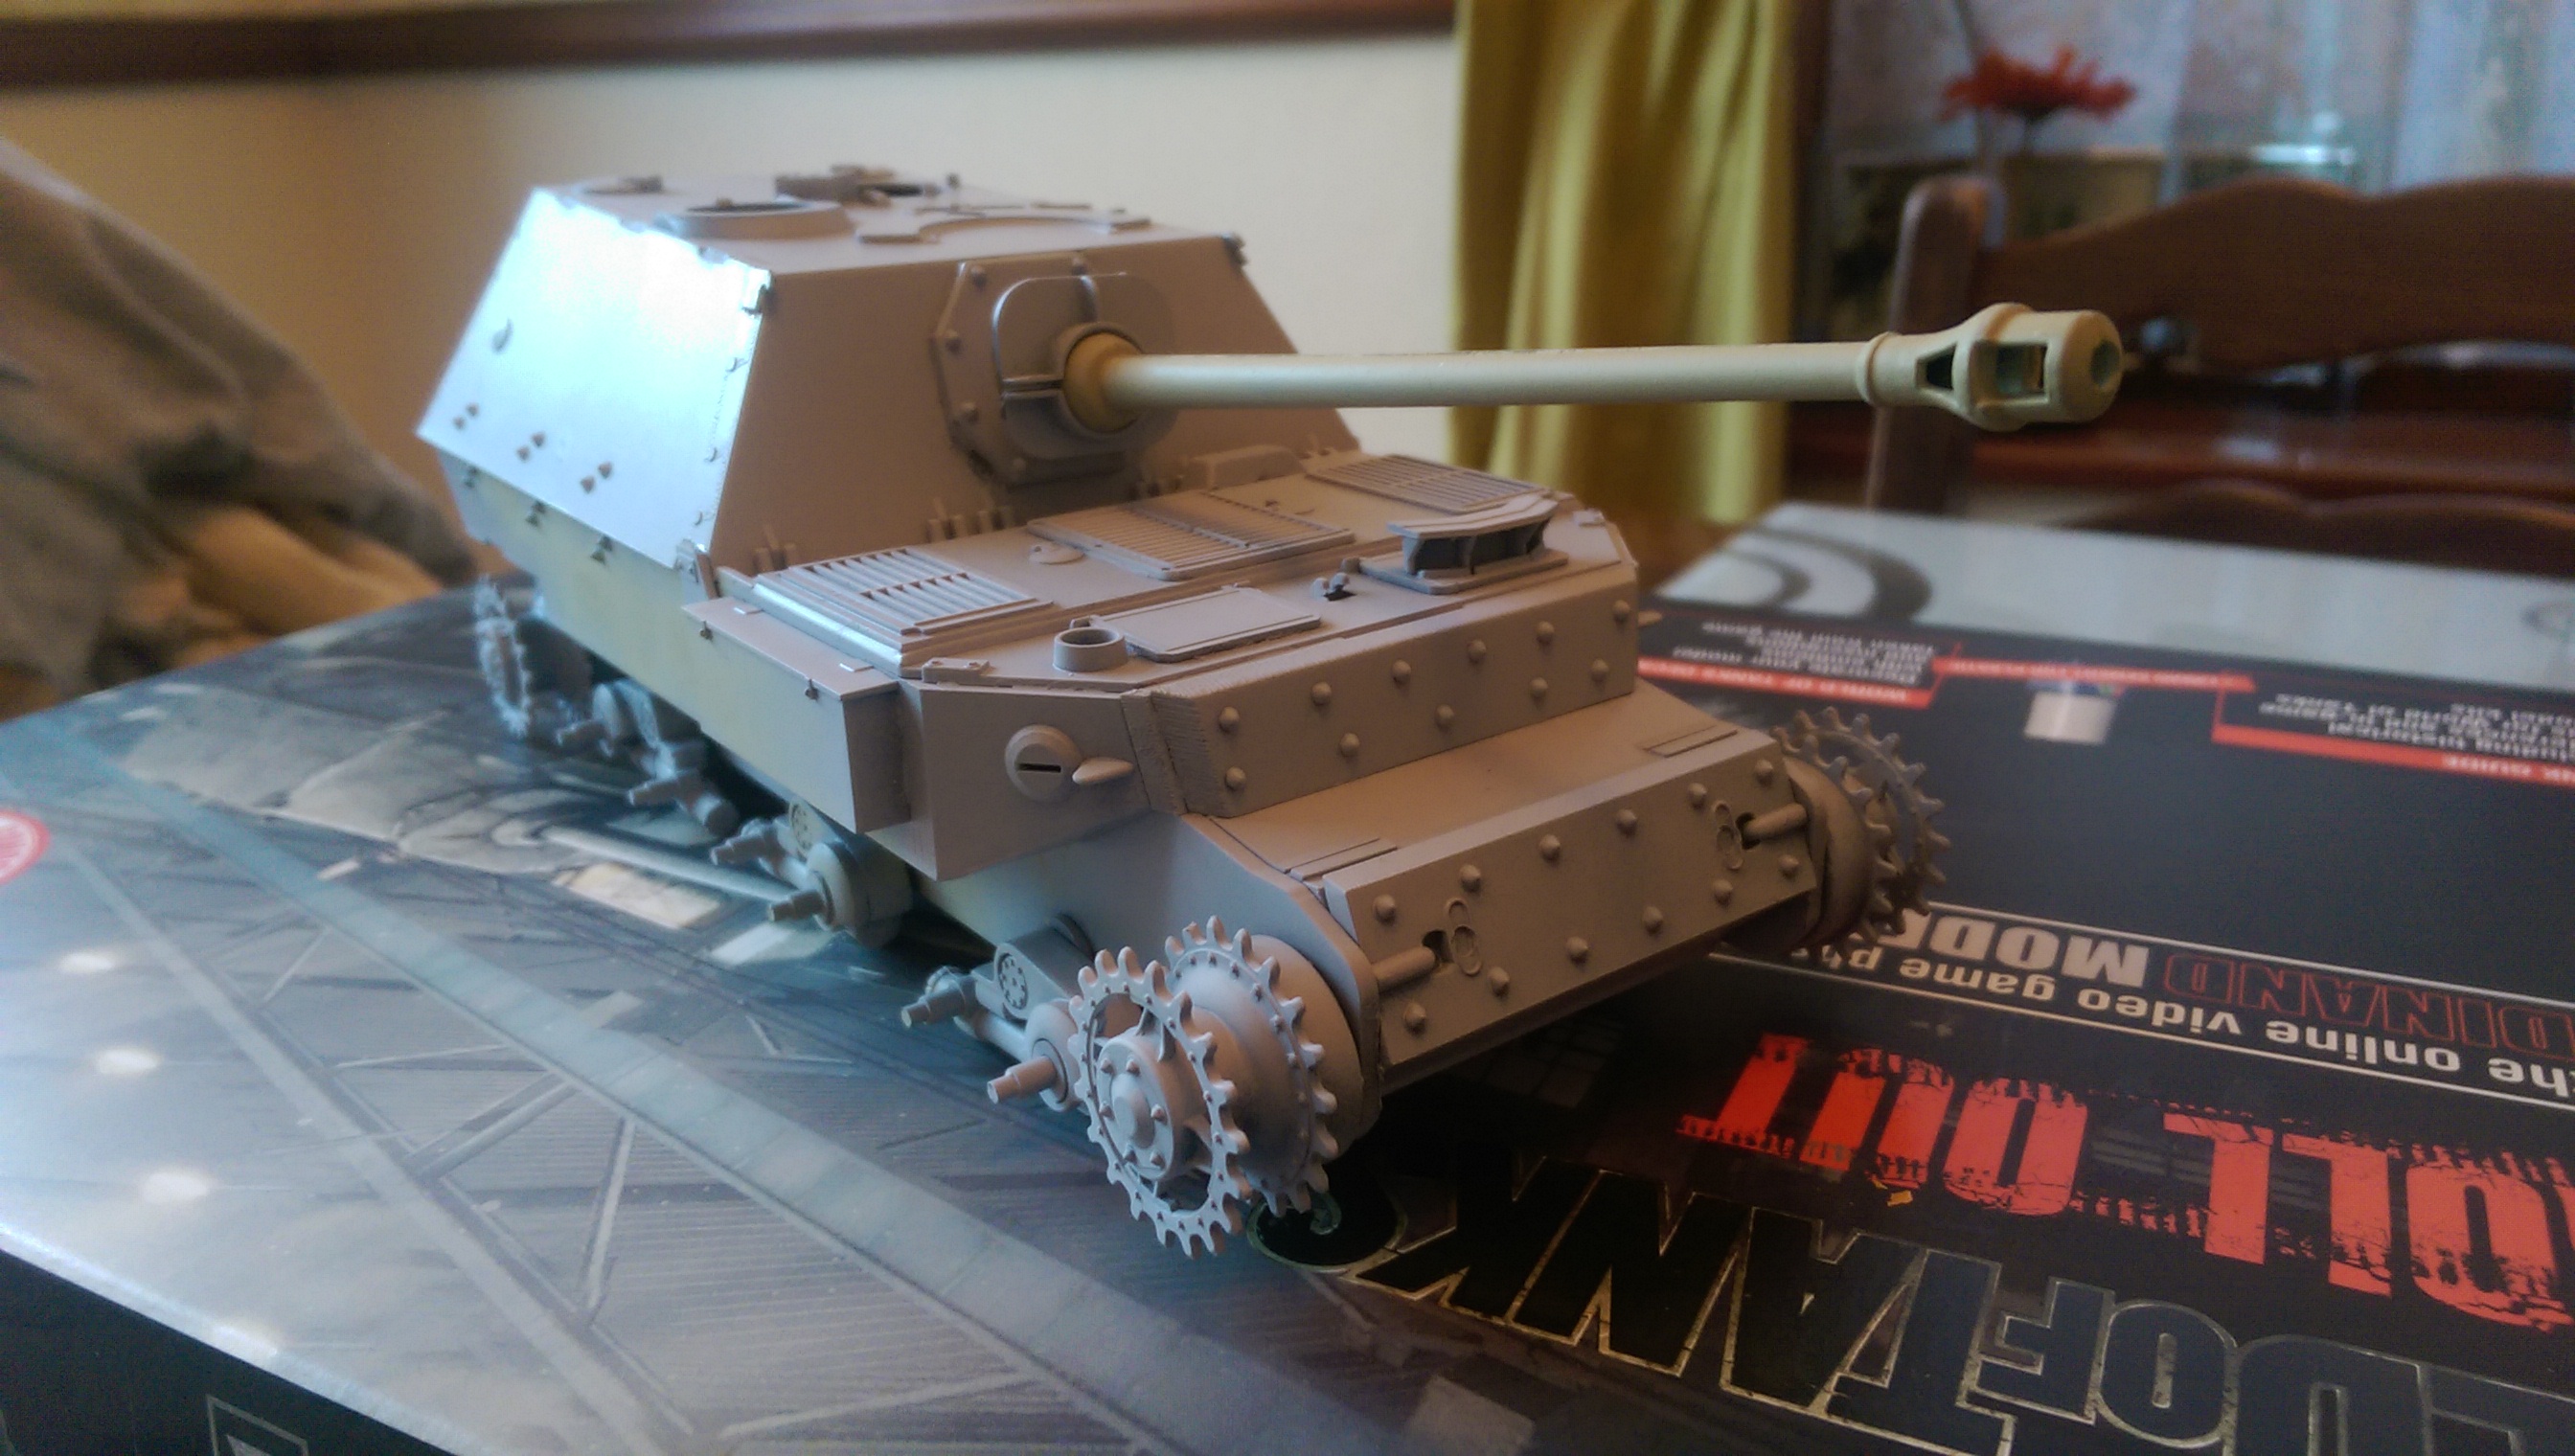
I am a keen player of World of Tanks, so when I discovered that there were WOT kits available I decided to investigate.

At first I thought these would just be re-branded releases of standard Italeri kits but you do get some nice WOT tanks extras.

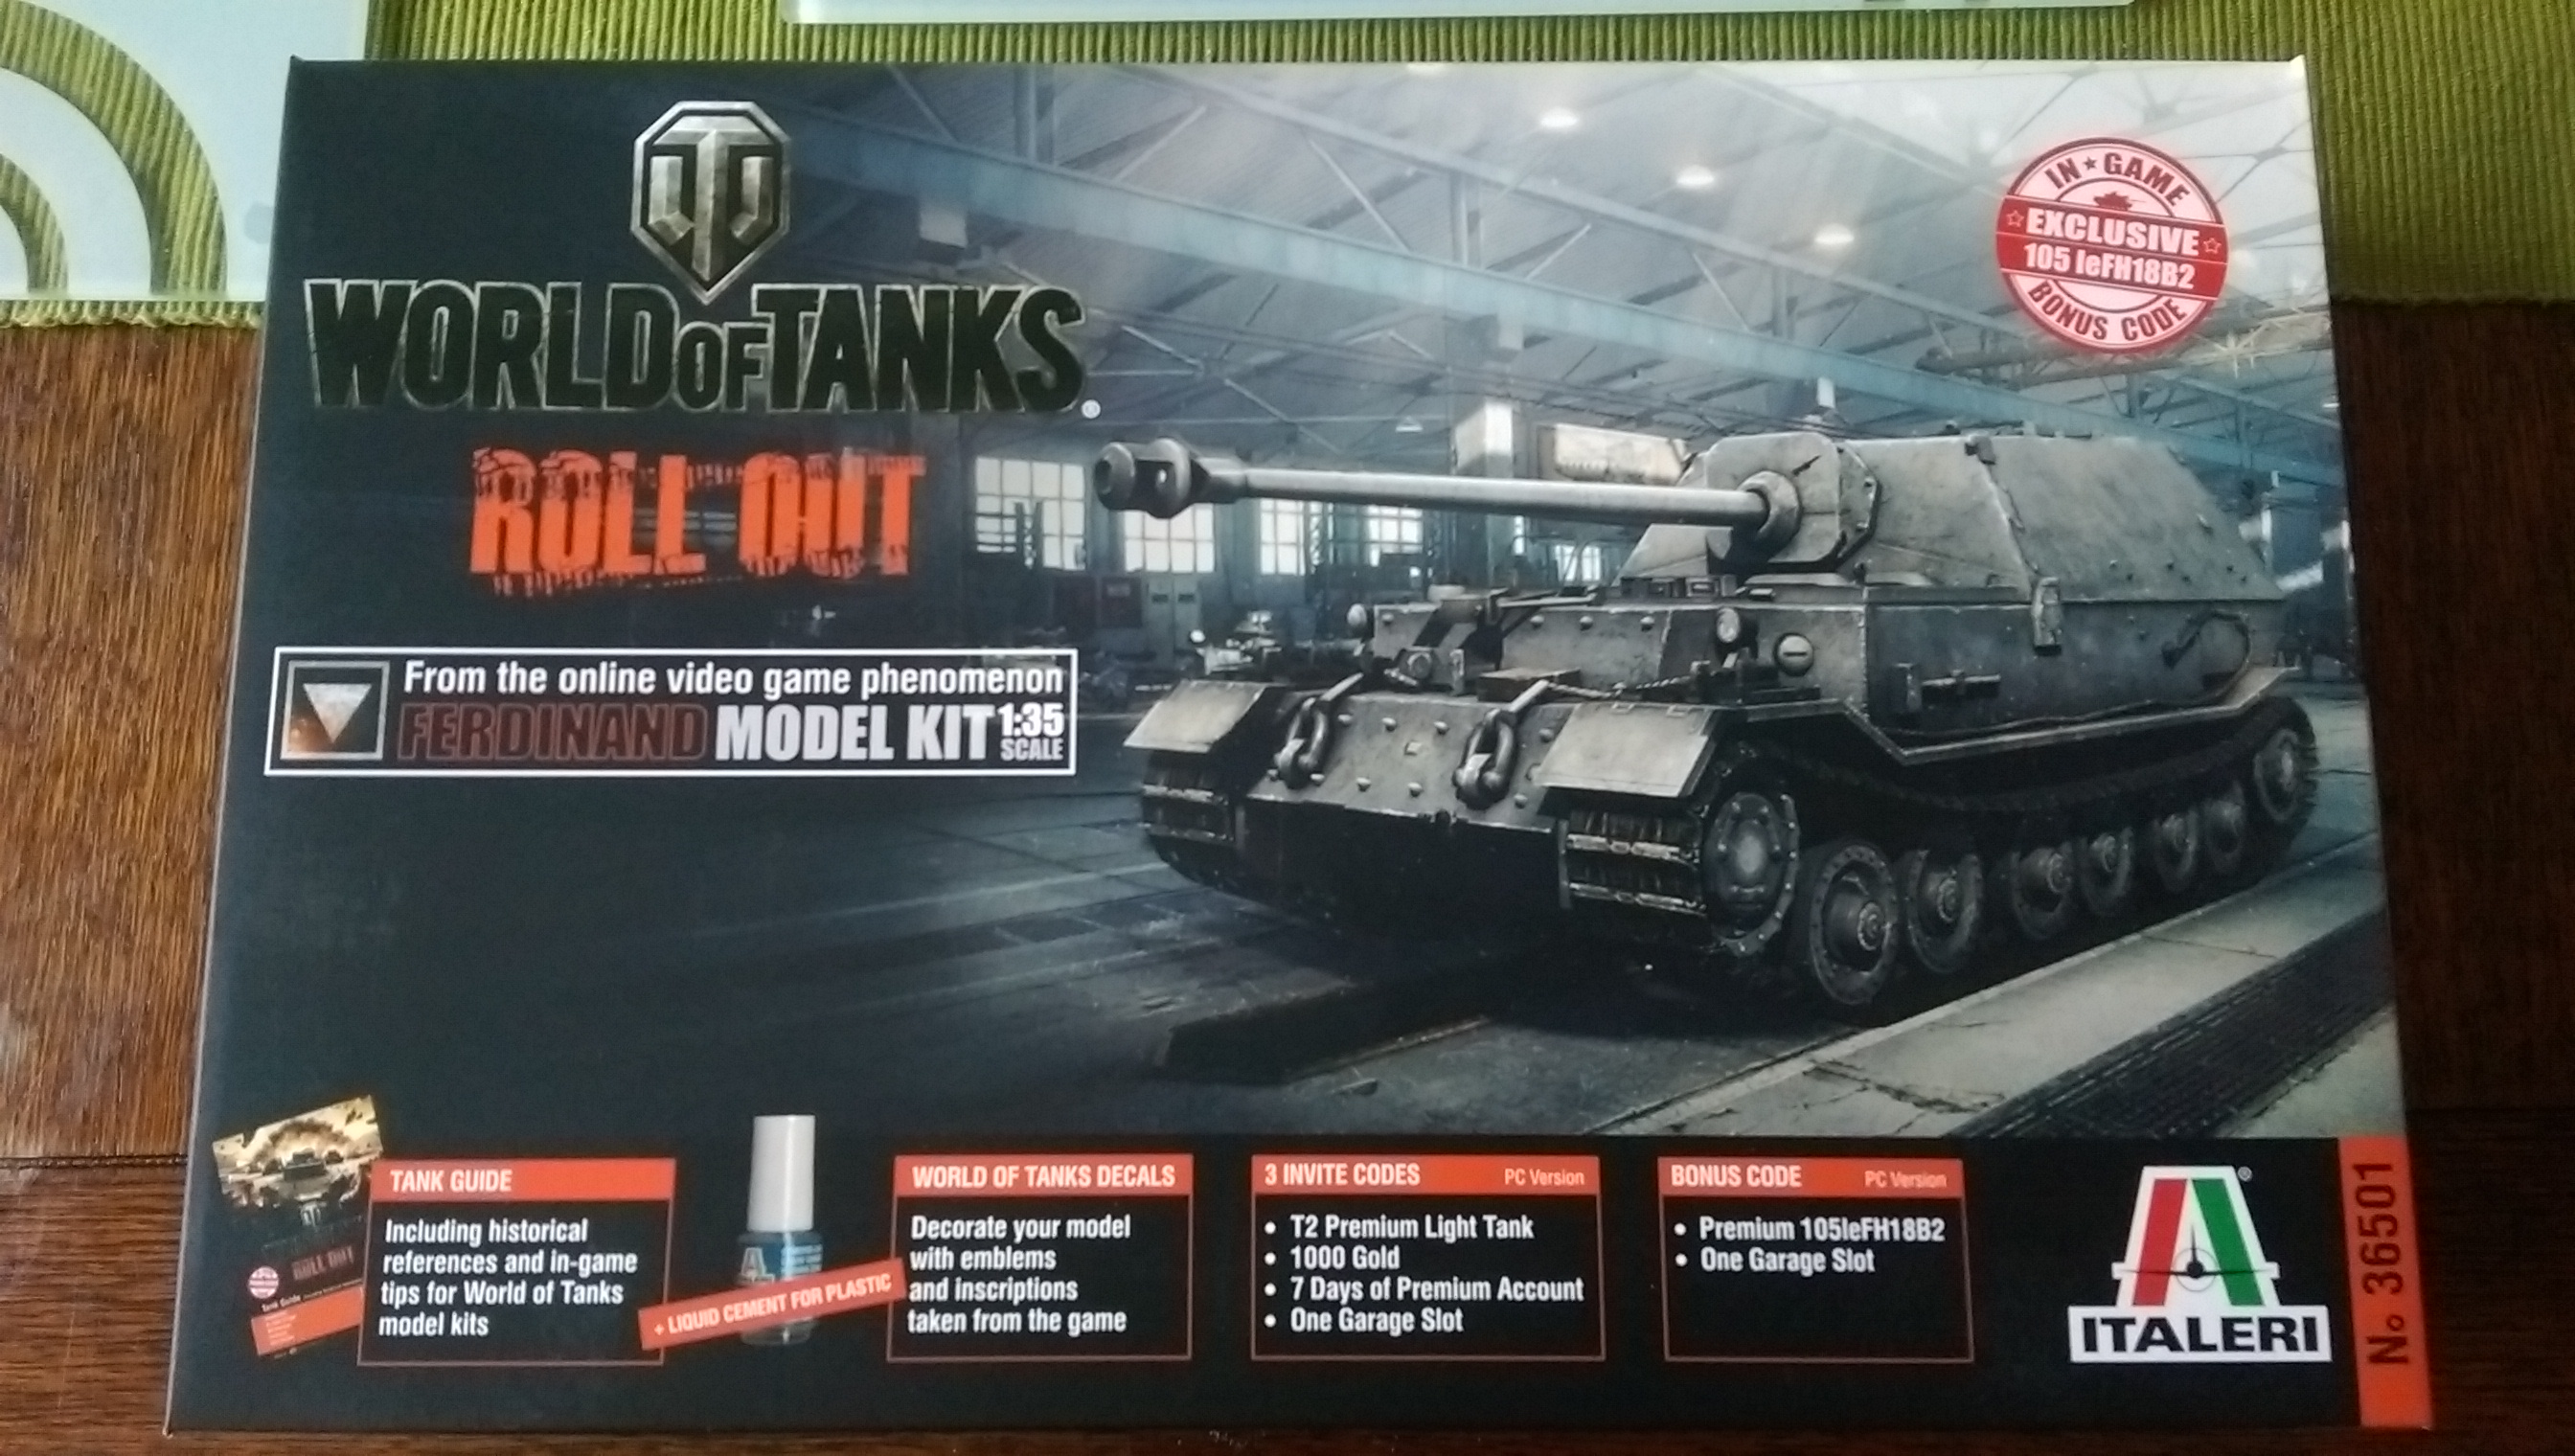
The main bonus is the inclusion of a code which will get you a special event premium tank in the game itself. Special events vehicles can not brought and are hard to get hold of. The vehicle that come with the Ferdinand is the 105 leFH18B2 Self propelled gun (shown below).

13199038368748404736_screenshots_2014-09-08_00001

As this is a premium vehicle it gets more credits, experience and crew experience than standard tanks you can get in game. It is the first of two SPG’s in the game. I have used thi vehicle several times in the game and am having great fun with it. It was actually the deciding factor in my purchase.

ferdinside

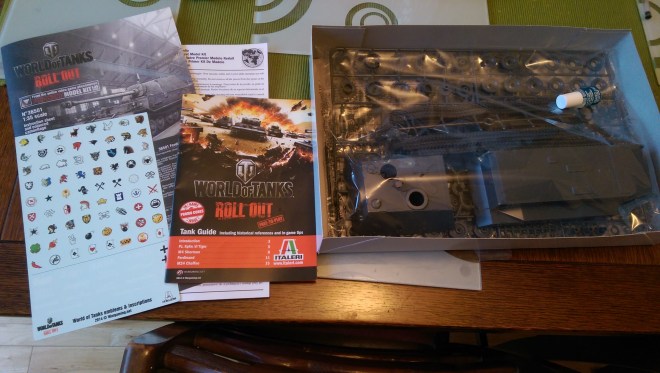
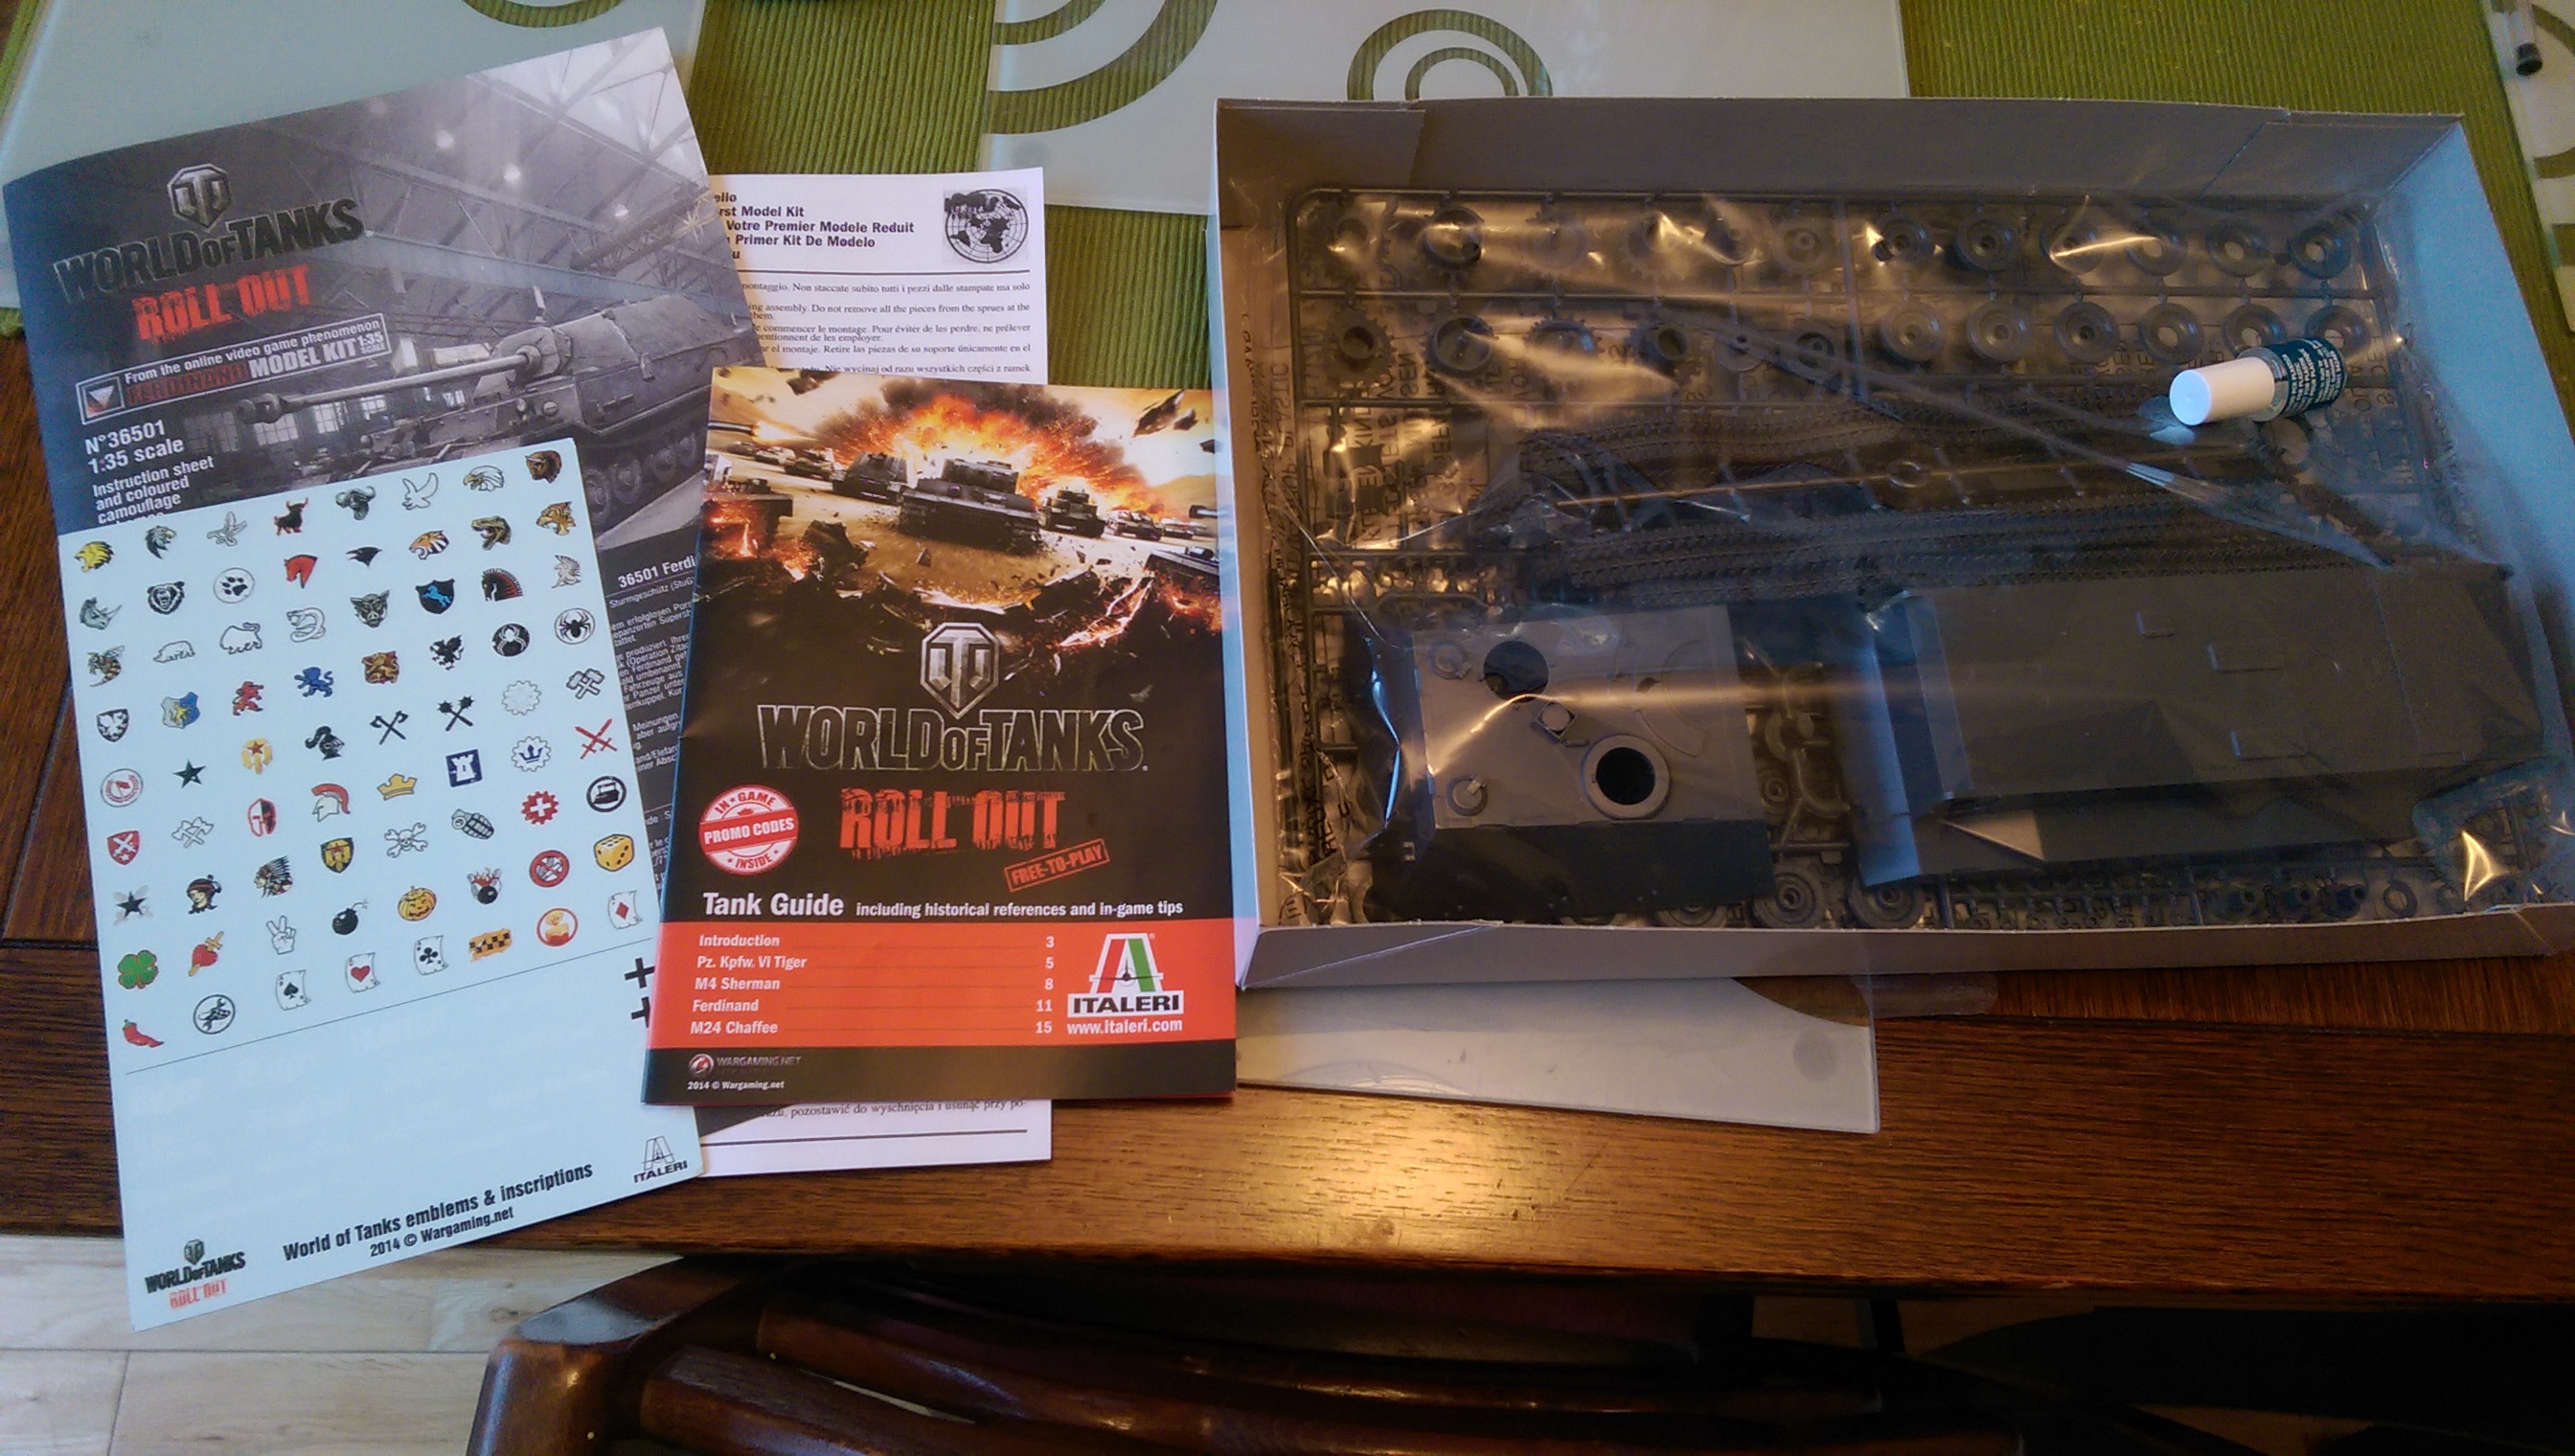
The kit also comes with a semi colour instruction book where the example camouflage scenes are in colour. These match some of the schemes you can purchase for German armour in game. There is also a decal sheet of some of the insignias from the game, this comes with both allied and axis decals despite the fact that it is a German tank destroyer.

Lastly you get a mini guide showing you the weak points of the world of tanks armour available in kit form.

(There is also a bottle of glue provided)

Flames of War German Armour

Last year at Tank Fest I purchased the Flames of War Open Fire Starter box.

For those who don’t know, flames of war is like a real war (mainly ww2) table top game like Warhammer.

Even if I never play the actual game I thought it would be nice to make the models in it.

wpid-wp-1405408657166.jpeg

I have recently built the Stug G tanks from the set as well as a Wittmans Tiger Tank I found on eBay. The Tiger kit was new and good fun to build. It has a resin hull with any additional parts to add being metal.

wpid-wp-1405408679009.jpeg

Here I have started the process of painting the models by giving them a coat of grey primer.

wpid-wp-1405408623829.jpeg

I then airbrushed the base coat for the models using lifecolor RAL 7028 DunkelGelb.

wpid-wp-1405408589543.jpeg

Yes DunkelGelb is that infamous colour of German armour that people will argue about till the end of time. Being basically dark yellow in German I guess its open to a lot of interpretation. I have used a variety of different shades of dark yellow on German Armour and find lifecolor’s one to be the best.

Tamiya 1:35 British Universal Carrier Progress

The Bren Gun Carrier is one of my favorite vehicles and its about time I got round to building one.

This is a nice kit as you get lots of accessories with it so you can customise the model to your liking. I have also been using this kit to practice improving the look of my figures.

There is still a lot of work to do here but its been an enjoyable build so far!

IMG_5471 IMG_5481

1/16 Tiger Tank Progress

I finally got round to doing some more work on my Tiger Tank. The parts I have been working on are the lower hull and front plate.

The brass etched mud flaps were a pain as you had to bend all the tiny parts into shape.
It is proving to be an expensive model to paint, I used two cans of spray paint on the hull and road wheels alone.