This is a new record for me regarding aerial photography. I flew my x4 quadcopter up to its highest (camera attached) altitude yet and got some nice footage of Portsmouth.
Look out for the flock of birds!
This is a new record for me regarding aerial photography. I flew my x4 quadcopter up to its highest (camera attached) altitude yet and got some nice footage of Portsmouth.
Look out for the flock of birds!
I thought I would attempt some loops and barrel rolls with the camera pod attached to my x4 quadcopter.
I did not get enough altitude on the first attempt to compensate for the extra weight added from the camera.
Barrel rolls look sweet in first person!
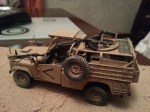
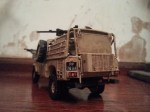
This is my Airfix WMIK Land Rover.

The model was painted with the suggested humbrol paints and washed using mig productions brown wash.
It was highlighted and weathered using a tamiya weathering kit.
I plan to use it in a diorama I am working on.


In this video i am testing a new miniture camera on my Heng Long Panzer IV. The quality is not great as its indoors and in low lighting. The camera comes with about 4 ways of attaching it to things but I just used blutack. Am certainly going to get the HD version of this camera.

I have had this idea for a while now but have had to wait till I got a helicopter with a decent fuselage to attach a camera pod to. Most reasonably priced helicopters that come with a camera are not very good so I have always wanted a mod a camera onto a decent single rotor one.
I recently brought the Hubsan Lynx single rotor that has a nice amount of flat space to attach an adhesive strip to.
This is a really simple mod. All you need is some picture hanging strips and a spy camera.

There is a large selection of spy cameras on Amazon and I brought a few different types to mess around with. The one that I decided to use with this mod fits the hanging strip nicely so I chose that one.

All you need to do is attach one strip to the camera…

…and the other to the underbelly of the helicopter.

The camera sticks really well and I am sure it will hold just fine.

The only problem I see so far is that the camera protrudes the landing gear so taking off could be tricky.

That’s all for now. Will hopefully test it at the weekend.


My repair to my monster trucks manifold was not good enough and it simply became detached again. This time I used permanent threadlock to seal the nuts to the manifold holding it in place. The only way you are supposed to be able to get threadlock off is with a heat gun meaning the engine vibrations will not loosen it.


I finally got round to doing some more work on my Tiger Tank. The parts I have been working on are the lower hull and front plate.


If there is one thing I have learned when it comes to R/C, its to give spares a thought before you purchase your new vehicle.
I know look at the avaliability of spares before making a purchase and pick up a few of the most common bits to break while I can get hold of them.
Its very easy to fall into the trap of buying a (often discontinued) model that is reduced in a store, only to find you break it in 5 minutes and can not get hold of the parts.
 The first thing I did after picking up my Blade 120 SR from model zone is buy a load of spares from rsbspares.com
If you are wondering what the blade 120 SR is then watch this.
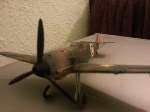
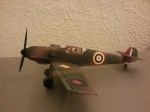
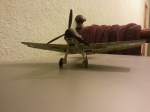
I am currently working on this years Airfix club kit. It is a 1:48 Messerschmitt Bf 109E-3/E7. There was a choice of two schemes for the kit. An aircraft given to the Japanese for trial purposes, or one captured by the British.
As you can see I chose the British scheme.

Still plenty more decals to go. Also got the aerial to add and the details to paint.