
The Micro:bit is a tiny computer designed by the BBC for educating children in computing.
You may think there is not much point in using the Micro:bit for robotics when there is the Raspberry PI and Arduino available but there is beauty in its simplicity.
Much like the Arduino you flash it with some code and it will run it until you flash it again. There are plenty of tutorials and different languages to use making it very quick and easy to work with. There are even block programming editors.
Recently I got my hands on a second Micro:bit so I thought I would have a go at Bluetooth communication between them having one as a transmitter to control a robot powered by the other.
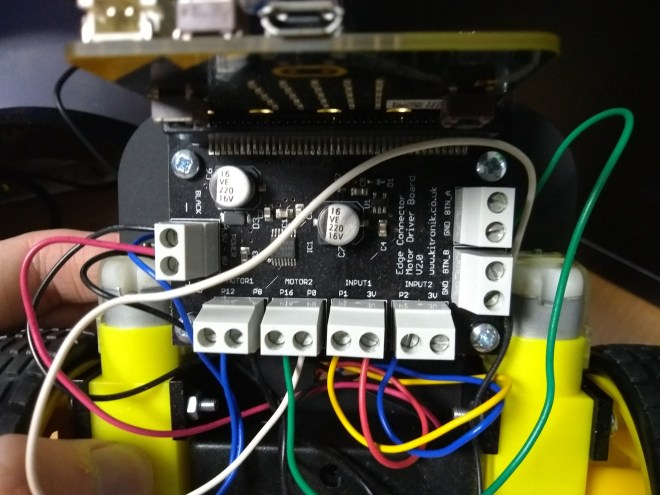
The robot kit I have here is the Kitronik line follower buggy. It uses a motor driver edge connector board to drive the motor and monitor inputs. The board is nicely labeled so that you can see which pins you needs to write to in order to control the motors.
Most of the editors for the Micro:bit are online only but I have found an offline Python editor called Mu that can be used and is my environment of choice. For this project though I decided to use Microsoft’s Javascript/block editor.
Below is the code flashed onto the robots Micro:bit. This code is very simple and basically monitors any incoming Bluetooth messages on radio group 1. If a message matches on in the if statement it will perform the associated action. Using the pin labels on the motor driver board it is easy to know which pin to write 1/0 to. If you want to use this on a different robot then all you should need to change is the pins to write to so they are the ones controlling your motors.
radio.onDataPacketReceived is a function called when a message is received. Any code below this function is what is run on startup.
radio.onDataPacketReceived(({ receivedString }) => {
    if (receivedString == "Left") {
        pins.digitalWritePin(DigitalPin.P8, 0)
        pins.digitalWritePin(DigitalPin.P0, 0)
        pins.digitalWritePin(DigitalPin.P12, 1)
        pins.digitalWritePin(DigitalPin.P16, 0)
    } else {
        if (receivedString == "Right") {
            pins.digitalWritePin(DigitalPin.P8, 0)
            pins.digitalWritePin(DigitalPin.P0, 0)
            pins.digitalWritePin(DigitalPin.P12, 0)
            pins.digitalWritePin(DigitalPin.P16, 1)
        } else {
            if (receivedString == "Forwards") {
                pins.digitalWritePin(DigitalPin.P8, 0)
                pins.digitalWritePin(DigitalPin.P0, 0)
                pins.digitalWritePin(DigitalPin.P12, 1)
                pins.digitalWritePin(DigitalPin.P16, 1)
            } else {
                if (receivedString == "Back") {
                    pins.digitalWritePin(DigitalPin.P12, 0)
                    pins.digitalWritePin(DigitalPin.P16, 0)
                    pins.digitalWritePin(DigitalPin.P8, 1)
                    pins.digitalWritePin(DigitalPin.P0, 1)
                } else {
                    if (receivedString == "Stop") {
                        pins.digitalWritePin(DigitalPin.P8, 0)
                        pins.digitalWritePin(DigitalPin.P0, 0)
                        pins.digitalWritePin(DigitalPin.P12, 0)
                        pins.digitalWritePin(DigitalPin.P16, 0)
                    }
                }
            }
        }
    }
})
radio.setGroup(1)
pins.digitalWritePin(DigitalPin.P8, 0)
pins.digitalWritePin(DigitalPin.P0, 0)
pins.digitalWritePin(DigitalPin.P12, 0)
pins.digitalWritePin(DigitalPin.P16, 0)
The Transmitter code is just as simple but creates some images to show the direction the robot is headed given the input received.
let i: Image = null
basic.forever(() => {
    if (input.buttonIsPressed(Button.AB)) {
        radio.sendString("Forwards")
        i = images.createImage(`
            . . # . .
            . # # # .
            # # # # #
            . . # . .
            . . # . .
            `)
        i.showImage(0)
    } else {
        if (input.buttonIsPressed(Button.A)) {
            radio.sendString("Left")
            i = images.createImage(`
                . . # . .
                . # # . .
                # # # # #
                . # # . .
                . . # . .
                `)
            i.showImage(0)
        } else {
            if (input.buttonIsPressed(Button.B)) {
                radio.sendString("Right")
                i = images.createImage(`
                    . . # . .
                    . . # # .
                    # # # # #
                    . . # # .
                    . . # . .
                    `)
                i.showImage(0)
            } else {
                if (input.pinIsPressed(TouchPin.P1)) {
                    radio.sendString("Back")
                    i = images.createImage(`
                        . . # . .
                        . . # . .
                        # # # # #
                        . # # # .
                        . . # . .
                        `)
                    i.showImage(0)
                } else {
                    radio.sendString("Stop")
                    i = images.createImage(`
                        . . # . .
                        . # # # .
                        # # # # #
                        . # # # .
                        . . # . .
                        `)
                    i.showImage(0)
                }
            }
        }
    }
    basic.pause(30)
})
radio.setGroup(1)
Pressing the A button turns left, B button turns right with both together making the robot go forwards. The pins on the Micro:bit can be used as buttons as well. If you hold the ground pin and pin 1 together the robot will reverse.
You can copy this code into the Microsoft editor and flash it onto your own Micro:bit or alternatively it should be pretty easy to convert it to Python.

Here it is in action. I actually started recording this because I could not believe the Bluetooth range! Its certainly the furthest I have ever seen a Bluetooth RC device go and still maintain control. I added a glass to the robot as payload for a bit of fun.
